Kicking off with How to Draw a Portrait: 10 Steps to Capturing Likeness, this opening paragraph is designed to captivate and engage the readers, setting the tone casual formal language style that unfolds with each word.
Starting with the basic principles of portrait drawing and moving into a step-by-step guide, this article will explore the essential techniques and tools needed to create a realistic portrait.
Basic Principles of Portrait Drawing

When it comes to drawing a portrait, there are several basic principles that are essential to capturing the likeness of the subject.
The Importance of Proportions
Proportions are crucial in portrait drawing as they determine the overall look and feel of the subject. Paying attention to the size and placement of facial features in relation to each other helps maintain a realistic representation.
Role of Lighting and Shadows
Lighting and shadows are key elements in creating depth and realism in a portrait. By understanding how light falls on the face and creates shadows, you can add dimension to your drawing and bring it to life.
Significance of Facial Features
Facial features such as eyes, nose, and mouth are unique to each individual and play a major role in capturing likeness. Emphasizing these features through careful observation and precise rendering can make your portrait more accurate and recognizable.
Step-by-Step Guide to Drawing a Portrait
Drawing a portrait requires attention to detail and careful observation of facial features. Here is a step-by-step guide to help you capture the likeness of your subject.
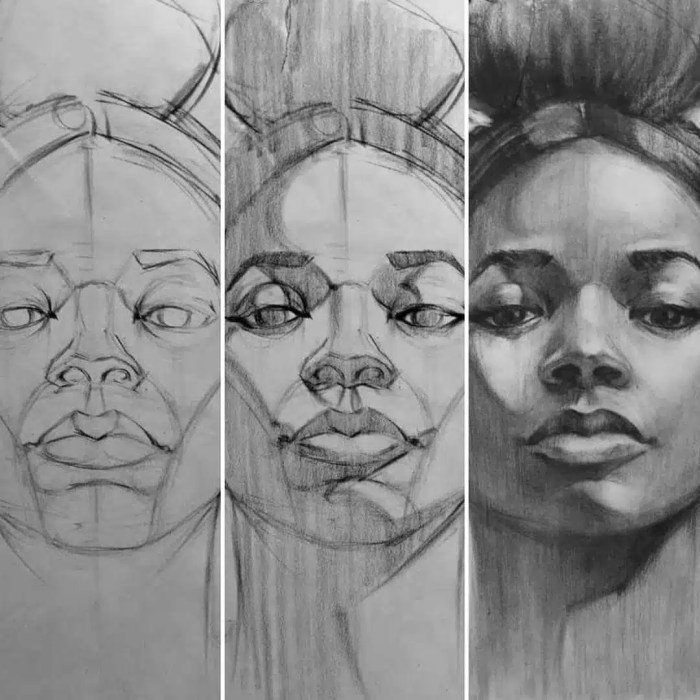
Sketching the Structure of the Face
To start, lightly sketch the basic shapes that make up the face, such as the oval shape for the head and lines for the center of the face. This will serve as the foundation for placing the features accurately.
- Use a light touch when sketching to allow for easy adjustments as you progress.
- Pay attention to proportions and angles to ensure the face looks realistic.
- Artikel the jawline, cheekbones, and ears to define the shape of the face.
Mapping Out the Placement of Eyes, Nose, and Mouth
Next, carefully map out the placement of the eyes, nose, and mouth based on the proportions of the face. Use guidelines to ensure symmetry and accuracy in positioning these features.
- Start by placing the eyes in the middle of the face, with one eye’s width of space between them.
- Position the nose below the eyes, with the bottom of the nose aligning with the corners of the eyes.
- Place the mouth slightly below the nose, ensuring that it aligns with the pupils of the eyes.
Adding Shading and Details
Once the basic structure and features are in place, you can start adding shading and details to bring the portrait to life. Use light and shadow to create depth and dimension in your drawing.
- Start by shading the areas of the face that would naturally be in shadow, such as under the chin and around the eyes.
- Pay attention to highlights and reflections to make the features appear more realistic.
- Add details like eyelashes, eyebrows, and wrinkles to enhance the likeness of the portrait.
Tools and Techniques for Portrait Drawing

When it comes to drawing a portrait, having the right tools and knowing the proper techniques can make a significant difference in the final outcome.
Essential Materials
Before you start drawing a portrait, make sure you have the following essential materials:
- Pencils: Invest in a set of high-quality graphite pencils with varying degrees of hardness for different shading effects.
- Erasers: Having a kneaded eraser for lightening areas and a precision eraser for fine details is crucial.
- Paper Types: Choose a smooth, heavyweight paper specifically designed for drawing portraits to ensure durability and quality.
Different Drawing Techniques
Experimenting with various drawing techniques can help you achieve realistic and lifelike portraits. Here are some techniques to try:
- Cross-Hatching: Create depth and texture by layering crisscrossing lines to build up shading and form.
- Blending: Use blending tools like blending stumps or your fingers to smooth out transitions between light and dark areas.
- Contour Drawing: Focus on the Artikel and contours of the face to capture the overall shape and proportions accurately.
Use of Reference Photos
Reference photos can be invaluable when drawing a portrait, but knowing how to interpret them correctly is essential. Here’s how to make the most of reference photos:
- Study Lighting: Pay attention to the direction and intensity of light in the photo to create realistic highlights and shadows in your drawing.
- Capture Likeness: Analyze the facial features and proportions in the photo to ensure you capture the likeness of the subject accurately.
- Focus on Details: Zoom in on specific details in the reference photo to replicate intricate textures and expressions in your portrait.
Ultimate Conclusion

Wrapping up the discussion on How to Draw a Portrait: 10 Steps to Capturing Likeness, it’s clear that mastering these techniques can help anyone improve their portrait drawing skills and capture a true likeness.